-
Audio
-
Guitar
-
Bass
-
Blog
-
SALE
-
Financing
- Support
- SINCE 1946

Knowing how to properly set the gain on each channel of your mixing console can go a long way in ensuring an optimal live or studio mix for your band. This knob, also referred to in some instances as the trim knob, is the first point of amplification and entry into your mixer. The term “trim” is also used, because it relates the high gain of the microphone pre-amp and the knob’s trimming back this gain. The purpose of the knob is to control the input volume of any instrument or microphone that you have plugged into that channel of the mixer or console.
Note: On some smaller mixers and power amp combo mixers the gain knob is replaced by a button that may be labeled “-20dB” or “mic gain”. This button’s function is the same as a knob. You don’t have to use this button if you are using a microphone as long as you are getting enough volume without it. Your microphone may be louder like in the case of a wireless microphone the output of the unit may be much higher than a simple wired microphone.
A microphone’s output is usually very low compared to a keyboard or guitar, so changes to the gain setting will be required when using different instruments or devices. The first goal when setting the knob is to bring all inputs up to a common level. This level is often set at 0dB on the meter. If you don’t have a channel meter indicating a 0dB level or solo meters, you can use the channel’s signal and clip indicator to set the level. This is more of a studio method and can run into problems in live settings. Live shows have few redoes. This method brings the level up to just flashing the clip indicator and then backs it off to no clipping, and then a little lower. Clipping will result in a harsh distorted sound, and may lead to speaker damage, so it should be avoided. If you have to use the clip method, watch the clip indicator often, so you can back it off more if you see clipping later in the show.
The 0dB gain setting method:
The simplest way to set gain on a console is to turn the channel output fader all the way down, and mute the channel in case a pre fader monitor is turned up. Then play the corresponding instrument at a normal performance level. This is always the tricky part, because often a player will not really play at performance level, because they are the only person playing. If your mixer has a SOLO with pre fader or PFL (Pre Fader Listen) feature, press that button and your input level pre- fader should show up on your main meters. Now you can watch the full meter readings for that channel and set the level to 0DB on the meters. Of course more dynamic instruments will bounce around on the meters, so a setting of under +6dB is fine. Gain settings much higher on this first setting will lower the dynamic headroom available for adding EQ adjustments, or may be to high when a player turns up or just plays harder during the show. Note: any boosting of equalization on that mixer channel will also increase the overall gain, especially if you are heavily boosting certain frequencies.
This 0dB method lets you now set all the channel faders to 0dB and bring up the master faders as needed. You may need to adjust the gain up or down a little to get the level in the monitors right, but if you started at the 0dB setting you should be able to set the monitors with just the channel monitor level. Now with the band playing you can adjust the channel faders for the overall mix. If a fader has to be turned up very high or brought down very low, and you have made sure it is still working properly, or basically you know why it changed from the sound check, you can adjust the mic-pre to position your fader better. Remember the gain changes everything on the channel including the monitor levels, so be ready if a monitor starts to feedback, or if you are turning the gain down readjust the person’s monitor level back up if needed.
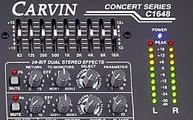
*When adjusting gain, think of the colors on the volume indicator like a traffic light. Green means you’re good to go, yellow means proceed with caution, and red means that you need to stop!*
Setting gain levels correctly will ensure the overall live mix is calibrated properly from the get-go. A sound check using good gain setting practices will always provide a clearer mix, a faster setup and limit surprises.

"If clarity matters this is the system for you." DJ Tyler Wallace reviews the Carvin Audio TRC200A 2000W Powered Column Array System in this video.

"This Is An Underrated Sound System!" DJ Tech Tips reviews the Carvin Audio TRC400A 4000W Powered Column Array System in this video.

Carvin TRC Active Column Array System features and setup video. Watch this video to discover the features and benefits of our active column array sound system. TRC Powered Column Array Systems offer portability with high SPL levels that project up to 400’ with exceptional clarity. Unsurpassed high frequency and deep bass response will place the audience in the center of your performance. TRC Systems are scalable and are available in 2000W, 4000W, and 8000W models.


